When I took my first Bikram yoga class I remember thinking how cruel it was to call half-moon with hands-to-feet the “first” posture in the series. It’s not a posture, it’s four! Here are some of my tips for ensuring half-moon with hands-to-feet pose works for you during and after class.
Half-Moon
 Work harder than you want to.
Martha Williams is the Minneapolis Bikram Yoga studio owner and close friend (pictured above). She taught me something very important about this posture: The harder you work in all four parts of this asana, the easier class will be. (I would say the only exception to this rule is if you have been practicing less than a month, in that case, pace yourself.) The beauty of this posture is that you stretch your body in every direction and work your major muscle groups, ensuring that you fully warm up and prepare for class. To top it all off, you will raise your heart rate, increase circulation and start the sweating (aka cooling) process.
Hung over? Work your side bends.
I used to be a bartender and I’d have a few drinks after my shift, then I’d get up and go to the 9:30 AM class the next morning. Sometimes I was … dehydrated. A wise teacher once said that if you’ve had too much to drink to work really hard in half-moon pose. This posture helps get your heart rate up, moving the blood around your body and engages all of your muscles and core. A steady breath throughout this posture will help increase your circulation and oxygen to your blood stream, getting rid of the residual alcohol.
Half-moon comes from your core and inner thighs.
Alignment is key in half-moon. How you execute the posture is always more important than the depth. Be sure to lift out of your hips and engage your lower abdomen during half-moon, this will help with your alignment more than rotating your shoulders and hips as the dialogue instructs (still make those adjustments if you need to). I find that if I enter the posture with a large breath and engage my core to its fullest, the alignment comes more naturally than if I simply move to the side and then try to make adjustments. Think of the side bends as coming from your core and inner thighs. Notice how Martha has a perfect half moon shape on the left side of her body and she is lifting – not crunching – the right side.
Backbend
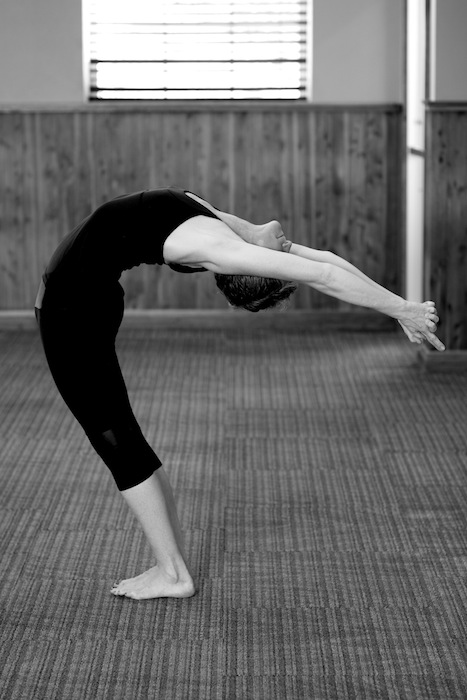
Anxious? Go back, way back in your backbend.
If you’re feeling particularly anxious, agitated, annoyed, or tired, work your backbend to its fullest and you will release that negative energy, clearing the way for a fun and strong class. Would you rather have a few seconds of discomfort or a grumpy 90 minute yoga class? The choice is yours.
Squeeze your buttocks in your back bend.
Also during my first class, I remember seeing this young bendy thing nearly touch the floor in her backbend. I thought, there’s no way I can do that, a common lie we tell ourselves in yoga class. There are two simple ways to go deeper in your back bend, squeeze your butt while pushing your hips forward and roll your weight into the back of your heels.
I lean into my backbend in one fluid movement but there are two distinct phases. The first phase is taking a deep breath, stretching towards the ceiling and lifting out of my lower spine. The second phase happens when I’m about a quarter of the way back, at that point I consciously move the weight back into my heels while simultaneously pushing my hips forward. Squeezing your buttocks not only helps move your hips forward to balance out your weight, it also helps you lift in your spine so you get a perfectly even back bend (rather than folding over in one part of your spine). Notice how Martha’s spine is evenly bending all along her back and although it may not look like it, her weight is in her heels. I simply love this photo of her!
Hands-to-Feet
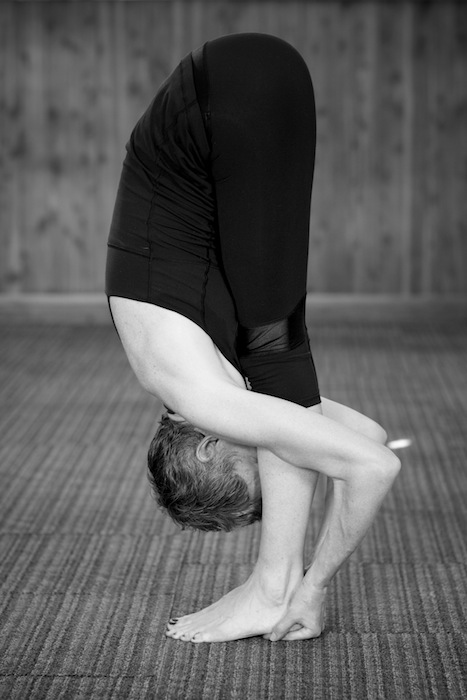
Hands-to-feet pose is key to your flexibility throughout class.
I’m not naturally flexible, so hands-to-feet pose, the fourth part of this posture is key to opening my hamstrings and hips. The work I put into this posture is directly proportional to how deep I can go in Standing Head to Knee and Standing Bow, working hard here pays dividends. Even if this posture is hard and uncomfortable try sticking with it, keep breathing and in time you will learn what a healthy “pain stretching sensation” feels like.
Watch for uneven hips when you’re pulling and lifting.
I never realized that my hips were very uneven when I was in this posture, until a teacher pointed it out for me. Stay after class sometime or ask a teacher to take a look when you are in the posture. You want your hips to be aligned rather than one popping up higher than the other. This will ensure you have an even stretch on your legs and hips.
The four parts of half-moon with hands-to-feet pose are challenging and also incredibly important, combine this with pranayama breathing and you’ll be ready to go. I think of this posture as a metaphor for class, what you put into it determines what you will receive in return. Work hard and you shall receive endless benefits.
Never miss a post and join my email list.


Thanks for this article on half-moon pose. I love your writing. It is clear, concise and compassionate. I will frequently try to get some of your pearls of wisdom when I teach. So, thank you for your good work. M
How do I begin? From the very start… I’ve never done a single pose, but I keep hearing how good it is for one’s overall health.
I’m a 55 year old male in reasonably good shape; however, I have a degenerative lumbar spine with a couple damaged disks; hence, I must be careful about how I work out (even seeing someone do the back bend hurts!)
How can I start? What reference materials should I read.
Any help would be much appreciated!
Hi James, I would do a google search for your city for a hot yoga or Bikram yoga studio. Find one that is close to your house and show up with a mat, towel, bottle of water and an open mind!
Hi, I have been practiced Bikram Yoga for many years. The frustration I have is that different teachers would give different instructions. For example, I was told to “imagine stamping my armpits to the mirror”, ie. opening up shoulders during this Half Moon Pose. Then I was asked to rotate my shoulders inwards by another teachers. So which is it?
Looking at your photo on this page published by Lindsay Dahl on July 25, 2015 in Yoga, Yoga tips on Working Hard in Half-Moon Can Save Your Yoga Practice, it seems like the shoulders were opening up and the armpits are facing forward. Is there someone who can validate this aspect of the posture?
Thanks & Regards,
Julie
Julie, Good question. While I’m not a certified Bikram instructor, here’s what I will say as someone who has practiced for over 10 years. It depends on your body shape. I would focus less on where your armpits are facing and more about the pull in your arms and extension on your side. For example, if you are pulling out of your hips and the extension goes all the way to your finger tips, your shoulders should naturally align. The more you practice, the more your shoulders will naturally roll back as well. The one thing you do not want to do (which is perhaps what some of your instructors are trying to correct) is to lift your shoulders to touch your ears. Your shoulders should be naturally relaxed down, while stretching through your sides, legs and arms.